Web Design Process: How Our Agency Delivers Consistent Projects
Schedule a Discovery Call
Fill out the form below and our bio-tech marketing team will be in touch!
At Digital Elevator, we chunk out our web design process into five different project phases, each of which we’ll break down into more detail below.
Before we begin
It’s important to note that the web design process can vary from company-to-company, as well as for different types of projects. A web design for a five page “online business card website” will vary greatly from that of a mid-market 250-page website, or a massive enterprise website.
It’s also important to note that the end-product is subjective. What is important is that the paying client is happy with the results and that they can align on the process to make a product that everyone is happy with, on time, and on budget.
If you are working with an agency like ours, you should have a timeline. Make sure that you are familiar with the timelines presented so you know your responsibilities as a client and so that you can avoid what is called “scope creep.” Scope creep occurs when the agreed-upon project is expanded or changed, which generally would entail the increase of the budget or timeline. Make sure you are aware of your responsibilities as a client and can communicate and provide assets quickly and efficiently so that you don’t bottleneck the project and cause unnecessary changes to the scope.
The 5 phase web design process
Every project needs a kickoff point to align on goals, expectations, design style, and the foundational elements. For smaller sites this can happen very quickly, but for larger projects it is important to take the time needed to get these aspects right.
This process, of course, assumes that a contract has been signed, money is in the bank, and the agency and client have aligned on particularly important expectations as related to time to launch, the phases and timelines, communication, and the gathering of assets like content and imagery.
Website Phase I- Discovery & Research
Confirm and refine objectives
So, you've got a brilliant idea for a website. But, before we jump into the design, let's make sure we know what the heck we're doing. Confirm and refine those objectives. What's the purpose of the site? Is it to sell widgets, spread knowledge, or just to make your cat famous on the internet? Here’s where we nail down your goals like a pro.
With our biotech web design clients, they often want to push out a website that better represents their corporate image, introduce their cutting-edge technology, or improve upon the delivery and aesthetics of their brand as a whole.
Confirm and refine target market
It's time to play web design detective! Who are your potential users? Are they hipster coffee lovers, tech-savvy millennials, or retirees looking for knitting patterns? Identifying your target market is like finding the right fishing spot - you want to cast your net where the fish are biting!
For our biotech clients, the end users are usually a combination of the following: healthcare professionals, C-level executives at pharmaceutical companies, private equity investors, potential employees, and peers. We’ll usually ask our clients for a copy of their buyer personas or at the very least have a conversation about who this target market is so we can understand how to cater the design to them.
Establish success criteria
Success isn't just about the number of likes you get on a cat video. What does success look like for your website? More leads, higher conversion rates, or simply a lot of happy users? Define the yardstick you'll measure success with, and let's get ready to knock it out of the park.
Establish preliminary site and page hierarchy
For larger sites with more complicated navigation, this step is important to establishing the most important pages on the site. For example, if a particular page converts leads really well, we want to potentially consider it as a more prominent page in the top menu or on the homepage as a link.
For biotech websites, the most important pages tend to be science or technology pages, pipeline pages, or leadership pages.
Setup staging environment
The staging environment is where the site will be developed. It is not public-facing or accessible to anyone other than the development team and provides a safe place to work on the site. The website will live in staging until it is ready to go live.
Create site breakdown
As part of our site breakdown phase, we create the sitemap, wireframe, and put the color palette and illustration needs to work.
What is a sitemap?
Think of a website sitemap as the digital blueprint for your site. Just like a map helps you navigate a city, a sitemap is a visual representation of your website's structure. It outlines all the pages, their hierarchy, and how they connect. It's like a table of contents for your website, giving both users and search engines a clear path to explore your content. It ensures that your website is organized and user-friendly, making it easier for people to find what they're looking for. So, if your website is a house, the sitemap is the floor plan that shows where each room is located.
For simplicity sake, it’s important to consider two types of sitemaps:
- Simple sitemaps for small websites
- Bigger, more in-depth sitemaps for larger websites
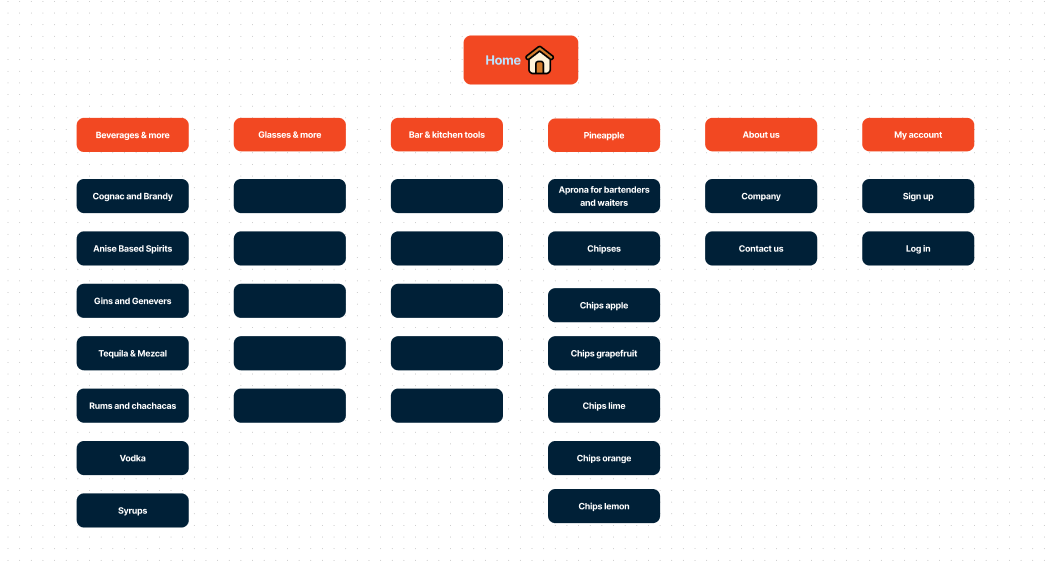
For simple sitemaps (think a 5-10 page website) we might just showcase it in the wireframe rather than isolating as a separate project or deliver something that looks like the following:
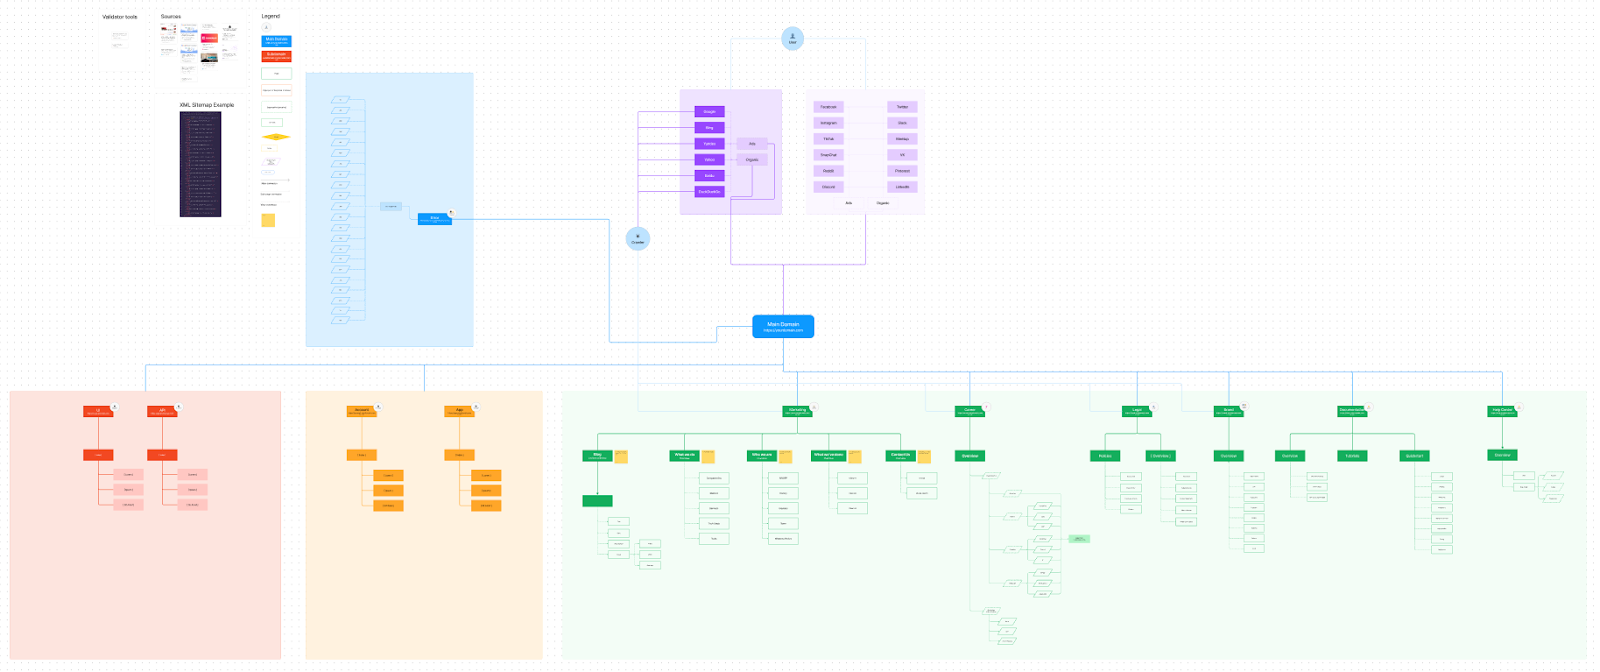
For a more complicated website where the site architecture is paramount to the success of the user experience, it might look more like this:
Before moving on to the wireframe, we make sure we are aligned on the sitemap portion of the project. The sitemap wll apply to the top menu and footer of the website, so we’ll often take into consideration best practices when we build these out and make recommendations for where to place content.
What is a wireframe?
Wireframes are the skeleton of your website. It's a simplified, low-fidelity visual representation of a web page, focusing on layout, structure, and functionality.
Wireframes typically don't include detailed graphics, colors, or content. They're more concerned with the placement of elements like text, images, buttons, and navigation. Wireframes help you plan the user experience, ensuring that your site is easy to navigate and that the elements are in the right places before diving into the full-blown design and development. In essence, wireframes are your website's architectural blueprints, helping you build a solid foundation for your digital masterpiece.
Note:
Lots of people get hung up on a website wireframe and expect more design elements than what they are actually intended for. As mentioned above, it’s sort of like a home’s architectural blueprints, not a representation of the final product. This is the place to collaborate on things like where certain content items are placed, the contents of a page, or how a dropdown menu might look.
This is not the place to collaborate on text, imagery, colors, or aesthetics- we get to that next!
That said, it’s important to know what a wireframe looks like and how the graphic design mockup that is inspired by the wireframe looks, which is coming up in the next section (if you can’t wait feel free to scroll down to see a wireframe a then the corresponding mockup)!
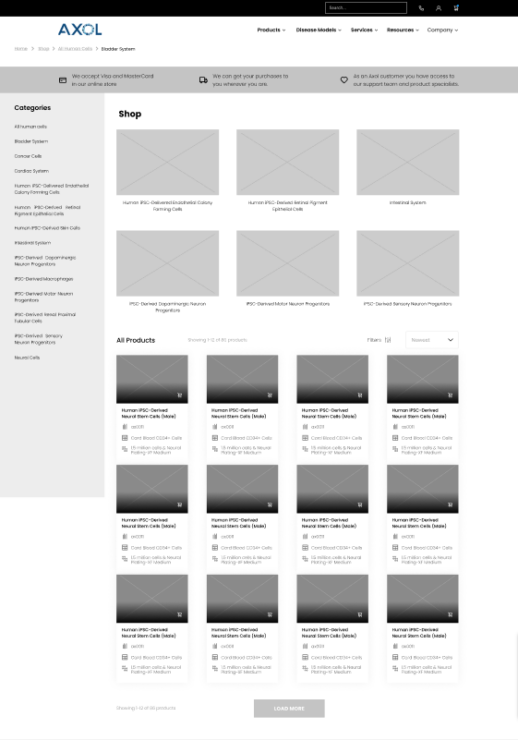
Here’s a wireframe example of an eCommerce page:
Phase II- Development of Strategic Concept
The development of the strategic concept is where the fun begins. It’s where you start to see your vision and the web design agency’s interpretation come to life.
Develop Graphic Strategies/Concepts
This is where the creative juices start flowing like a gourmet coffee machine. Developing graphic strategies and concepts involves brainstorming ideas, visual styles, and design approaches that align with your website's objectives and brand identity. It's like creating a design recipe that will make your website visually delicious. This stage sets the tone for the entire design process, ensuring that the visuals will not only look good but also serve a purpose.
When we get into the graphic design phase of the engagement, we’ll start with the homepage, as it sets the rest of the internal pages up for success. In other words, if your engagement with us involves the graphic mockups of several pages, those will come after the homepage design is approved, not in tandem with them.
Present Options for Evaluation (Digital Files)
Time to put your ideas on the table! In this step, you'll take those brilliant graphic strategies and turn them into digital design files. These files can be in the form of images, mockups, or prototypes, showcasing the proposed design concepts. It's like presenting a menu of options to your client. You're saying, "Here are three different visual flavors for your website. Take a taste and see which one suits your palate." Digital files make it easy to share and evaluate design concepts with your team or clients.
Here’s an example of a graphic design mockup based on the aforementioned wireframe:
We’ll then send this, along with any other variations you might receive, over via a digital file like Adobe or Figma.
We’ll then have a meeting with you to review your perception of the mockup and begin any editing processes.
Client to Select Concept for Refinement:
It's decision time! The client steps into the role of a design critic, choosing their favorite concept from the presented options. This is like ordering the dish that made your mouth water the most from the restaurant menu. Once the client makes their selection, it becomes the primary direction for further development. It's the "aha" moment when everyone agrees on the path to take.
The options we provide depend on the scope of the contract, but may vary in things like: images selected, image layouts, font size or color, or icons.
For example, these two “hero” sections of the homepage have a completely different look. It is up to your team to decide what direction you want to go in!
Incorporation of Feedback and Revisions
After the concept selection, it's time to fine-tune the chosen design. This stage is all about incorporating feedback and making necessary revisions to get the design just right. Feedback might come from the client, stakeholders, or the design team itself. It's a bit like crafting the perfect dish with just the right amount of spice and seasoning based on your taste test. Revisions ensure that the design aligns with the client's vision and objectives, making it a delectable visual experience.
The final mockup is chosen and we then move on to the development of the website according to the design mocks.
For sites with multiple graphic design mockups, we will move on to repeating the wireframe and mockup stage for all of the additional pages. Rather than doing them one at a time, we can send over all the wireframes at once, then move on to the graphic design portion since we have the general design aesthetic nailed down from the homepage.
Phase III- Development
Here’s where things might go a bit quiet between you and the agency as most of the collaboration and communication has taken place getting up to this point. We’ll be building your new website on a staging server and trying to get it as pixel perfect as possible.
This is also where we will take into consideration any functionality that is needed including things like CRM integration, form integration, plugins, databases, gated content, security protocols, or other specific functionality agreed-upon during the contract phase.
The time required here greatly depends on the size of the website, the functionality needed, the content migration process, and any content items the client needs to send over (bio content, headshots, service page content, etc.).
Phase IV- Quality Assurance
The quality assurance phase of the website build ensures the website rolls out as a well-oiled machine.
Revisions, Final Development, and Programming
This phase is where the rubber meets the road. If any functionality or aesthetic improvements are identified late in the development process, it's time to implement those changes and fine-tune the website. Any necessary revisions are incorporated, and the final development and programming work begins. It's like putting the finishing touches on a painting or adding the last ingredients to a recipe to make it perfect. This is where the design and functionality blend seamlessly.
Alpha & Beta Testing
Think of alpha and beta testing as the dress rehearsals before your website's grand opening. Alpha testing is typically done in-house, where the development team scrutinizes the website for any technical issues, bugs, or inconsistencies. Once that's sorted, it's time for the beta testing phase, where a select group of users or testers gets to play with your website. This includes mobile testing to ensure it's responsive and user-friendly on various devices, cross-browser compatibility checks to make sure it works on different web browsers, and site speed testing to ensure your site loads as fast as a caffeinated cheetah.
Beta testing is usually done by the client so they can perform their due diligence and interact with the site before it goes live.
Google Analytics Setup, Google Search Console Setup
It's time to let the web giants in on your secret. Setting up Google Analytics and Google Search Console is like inviting Google to the party. Google Analytics gives you insights into your website's performance, such as traffic, user behavior, and conversion rates. It's like having a data-driven spy at your disposal. Google Search Console helps you monitor your site's presence in Google's search results and provides valuable information about how your site is performing in search. It's like having your very own search engine butler who keeps you informed about your website's SEO health.
For sites with existing analytics or Search Console accounts, we will incorporate them so there are no lapses in data. For sites without them, we can create these integrations and put them in place for you.
Phase V- Launch
Finally, we are going to release the site into the wild! Before we do this, we need to get some things in order.
Offline Preview
It's like having a sneak peek of a movie before it hits the big screen. In the offline preview phase, your website is accessible on a development or staging server that's not publicly visible. It allows you and your team to thoroughly review the website one last time before the grand opening. Think of it as the final dress rehearsal to spot any last-minute wardrobe malfunctions.
Revise Site as Necessary
The preview often reveals a few surprises. During this phase, you have the chance to make any necessary last-minute adjustments and fixes. It's like having an emergency tailor on hand to quickly mend any loose seams or adjust the fit of your website.
Installation and Testing on Designated Server
Once your website is polished to perfection, it's time to set it up on the designated server where it will live on the internet. This is like moving into your new house. You want to make sure everything is in its place and working smoothly. It's the technical equivalent of checking if the plumbing and electricity are in order.
Go Live
The curtains are about to rise, and it's time for your website to make its grand entrance into the online world. Going live means making your website accessible to the public. It's the moment when your digital masterpiece steps into the spotlight for everyone to see. Just like opening night at the theater, it's both thrilling and nerve-wracking.
Post-Launch Analysis
After the big debut, it's essential to review the website's performance. This includes analyzing user engagement, tracking traffic, and making sure everything is functioning as expected. It's like reading the reviews and gathering feedback after a movie premiere – it helps you understand how well your website is resonating with its audience.
Post-Launch QA and Debugging
Even after the launch, the show must go on. Post-launch quality assurance and debugging are about catching any unforeseen glitches, errors, or issues that might have slipped through the cracks. It's like finding typos in a best-selling novel after it's been published. The goal is to ensure your website continues to run smoothly and provide an excellent user experience.